As many may know I started up an online Fly Shop in the last couple years, and I recently redesigned the website. I believe the new design is a big improvement and offers much more room for expanding my inventory of products. So head on over to www.jumpcreekflies.com and check out our new look, and while your at it, take advantage of our Grand Opening Special. With any purchase of a dozen or more flies get 6 more flies of your choice FREE!
It's never too early to start thinking about your next trip to the river!

Showing posts with label Fly Tying. Show all posts
Showing posts with label Fly Tying. Show all posts
11.26.2012
4.03.2012


2.10.2012
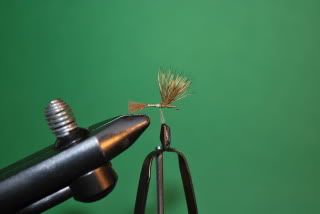
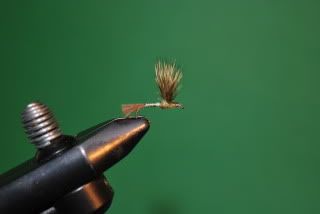
Still got it and, I (heart) dual purpose flies
I went a whole month without fishing. Yes it's true. I didn't like it either. Actually the drought stretched almost two months. The last time I was on the water was around my Birthday in early December. So for the first month in almost three years, I did not catch a fish in the month of January this year. That's my sob story, but there is only one way to fix this problem. It was time to take action.
This winter has been fairly busy, but still there is no excuse. My fly tying has taken off and really kept me busy but that is definitely not an excuse. Honestly I do enjoy tying a good fly almost as much as fishing, so the time spent at the vise these last couple months has been very enjoyable. Maybe that's one reason I haven't fished as much. Keeping busy tying scratched that itch just enough. But still there comes a time when a person just has had enough and needs to hold the cork,waive the stick, and put some of those creations from the vise in front of some fish.
There is a moment of self doubt when I pick up an activity again after a little time off. Each winter the first time I hit the ski slopes, I always wonder on the lift ride up the mountain for that first run if I have completely forgotten how to ski. In the case of skiing my fear is often very legitimate though as I take my first run of the year tumbling down the mountain. So as I drove up the road to the river yesterday I wondered if in two months off from fishing I had forgotten how to properly present a #22 midge to a wily brown trout.
However as I pulled up to the first run I wanted to check out and looked down into a stretch of water filled with rising trout, instinct took over and I became a flurry of activity. Waders on, Boots, Fly rod rigged, off to the water without even a second thought of how well I would be able to present a fly to these fish. Then as I reached the edge of the water it hit me. This is real. The frantic pace at which I had gotten ready quickly shifted to a much slower gear, and every step in the calm section of river was made with extreme caution not to make any sudden movements that throw ripples over these fish, and tip them off to my presence. Getting my wading legs under me proved interesting. In my eagerness I placed a boot on the side of a hidden rock and slipped a bit. Careful. Pausing to give a chance for the slight disturbance this caused to subside I saw the fish were still slurping away. No harm no foul. But now the doubts were back.
These fish were not going to just come to the net. They were feeding in a calm slow moving section of river on midges, and from my experience, more likely half emerged midges, not the fully hatched adults that littered the surface. I tied on a Harrops Transitional Midge, one of my favorite midge patterns and took aim at the closest snout.

First cast, you guessed it, the back cast got caught up in a bank side willow I had misjudged my proximity to. After slipping a few times getting in, and not wanting to wade back to the shore if I could help it, I took the lazy route and tugged on the fly a few times and was pleasantly surprised when it popped free still attached to the tippet. Without examining the fly I loaded the rod and dropped a fair cast in the feeding zone of the nearest trout. Sure enough, my fly selection had been spot on, as if on cue the trout rose and grapped the bug. I set the hook, but it popped free. Oh well I had got a take, my confidence was improving. But it quickly turned to frustration.
The next three fish all had the same story. I would finally get a good drift, have them take, and have the hook come free on the set. I am just rusty I thought. But I decided to take a look at the fly. Well it seems the fly I was using was missing a key ingredient. The hook point. Apparently popping the small fly out of the willow, had broken the hook at the bend, so I was practicing the ultimate in catch and release techniques. As I examined my fly box for a replacement I realized that this had been the only transitional midge pattern in my box. So much for all that time at the vise, apparently tying every pattern but the Harrops Transitional midge.
So I resorted to trying out several patterns over the next 15 minutes, mostly they all were meant to mimic the adult midge, but I tried to modify and fish them as much like the transitional as possible. It wasn't working. The fish ignored every other fly. Then I had an idea. I have a mayfly emerger pattern I tie that uses a similar CDC bubble on the back of the fly that really works well during the appropriate mayfly hatch. The Bubbleback Emerger.
 This picture is of the PMD version of the fly, but I tie a BWO version that is darker and on the whole I tie it in smaller sizes. So I wondered, even though there were no BWO's to be seen, if this pattern would pass well enough for a transitional midge. I tied on the smallest one I had, and made my approach to a big snout rising regularly just off the bank along a partly visible boulder jutting from the water. It didn't take long to find out if the fish would take this fly as a midge. The fly landed and wasn't on the water for more than a couple seconds when that fish rose and engulfed it. And with the help of an actual hook point on this fly, I was connected to my first fish of 2012.
As the fish took to the air, then ripped up river, then back down, I simply put my head back and breathed a huge breath of fresh air, relishing the moment. The fish was a healthy 18 incher that didn't come in without a fight. Finally a fish to hand.
As the hour wore on I hooked and landed 5 more fish on the BWO Bubble Emerger in the midst of a blanket midge hatch, and discovered a new use for one of my favorite mayfly emerger patterns. Life is good, and I can still catch fish. Ahhhh.
This winter has been fairly busy, but still there is no excuse. My fly tying has taken off and really kept me busy but that is definitely not an excuse. Honestly I do enjoy tying a good fly almost as much as fishing, so the time spent at the vise these last couple months has been very enjoyable. Maybe that's one reason I haven't fished as much. Keeping busy tying scratched that itch just enough. But still there comes a time when a person just has had enough and needs to hold the cork,waive the stick, and put some of those creations from the vise in front of some fish.
There is a moment of self doubt when I pick up an activity again after a little time off. Each winter the first time I hit the ski slopes, I always wonder on the lift ride up the mountain for that first run if I have completely forgotten how to ski. In the case of skiing my fear is often very legitimate though as I take my first run of the year tumbling down the mountain. So as I drove up the road to the river yesterday I wondered if in two months off from fishing I had forgotten how to properly present a #22 midge to a wily brown trout.
However as I pulled up to the first run I wanted to check out and looked down into a stretch of water filled with rising trout, instinct took over and I became a flurry of activity. Waders on, Boots, Fly rod rigged, off to the water without even a second thought of how well I would be able to present a fly to these fish. Then as I reached the edge of the water it hit me. This is real. The frantic pace at which I had gotten ready quickly shifted to a much slower gear, and every step in the calm section of river was made with extreme caution not to make any sudden movements that throw ripples over these fish, and tip them off to my presence. Getting my wading legs under me proved interesting. In my eagerness I placed a boot on the side of a hidden rock and slipped a bit. Careful. Pausing to give a chance for the slight disturbance this caused to subside I saw the fish were still slurping away. No harm no foul. But now the doubts were back.
These fish were not going to just come to the net. They were feeding in a calm slow moving section of river on midges, and from my experience, more likely half emerged midges, not the fully hatched adults that littered the surface. I tied on a Harrops Transitional Midge, one of my favorite midge patterns and took aim at the closest snout.

First cast, you guessed it, the back cast got caught up in a bank side willow I had misjudged my proximity to. After slipping a few times getting in, and not wanting to wade back to the shore if I could help it, I took the lazy route and tugged on the fly a few times and was pleasantly surprised when it popped free still attached to the tippet. Without examining the fly I loaded the rod and dropped a fair cast in the feeding zone of the nearest trout. Sure enough, my fly selection had been spot on, as if on cue the trout rose and grapped the bug. I set the hook, but it popped free. Oh well I had got a take, my confidence was improving. But it quickly turned to frustration.
The next three fish all had the same story. I would finally get a good drift, have them take, and have the hook come free on the set. I am just rusty I thought. But I decided to take a look at the fly. Well it seems the fly I was using was missing a key ingredient. The hook point. Apparently popping the small fly out of the willow, had broken the hook at the bend, so I was practicing the ultimate in catch and release techniques. As I examined my fly box for a replacement I realized that this had been the only transitional midge pattern in my box. So much for all that time at the vise, apparently tying every pattern but the Harrops Transitional midge.
So I resorted to trying out several patterns over the next 15 minutes, mostly they all were meant to mimic the adult midge, but I tried to modify and fish them as much like the transitional as possible. It wasn't working. The fish ignored every other fly. Then I had an idea. I have a mayfly emerger pattern I tie that uses a similar CDC bubble on the back of the fly that really works well during the appropriate mayfly hatch. The Bubbleback Emerger.

As the fish took to the air, then ripped up river, then back down, I simply put my head back and breathed a huge breath of fresh air, relishing the moment. The fish was a healthy 18 incher that didn't come in without a fight. Finally a fish to hand.
As the hour wore on I hooked and landed 5 more fish on the BWO Bubble Emerger in the midst of a blanket midge hatch, and discovered a new use for one of my favorite mayfly emerger patterns. Life is good, and I can still catch fish. Ahhhh.
1.26.2012
8.11.2011
My first attempt at videography
And it probably shows. This morning I made a point to try and get a set up with the video camera on a feeding fish and see if I could get the take on film. Turns out that is a bit tougher than it sounds. Especially when you are a one man operation.
I recieved one of these gorilla pods for Fathers day back in June and it really came in handy when I was looking for a place to put the camera while setting up for these shots.
The first set up I tried I got a little too close to the fish, and the commotion put the fish down. The second set up results in the opening scene of the video where you will see the wake of a nice fish take off from the left side of your screen.
Finally I put the camera away to work the next feeding fish I found and promptly hooked up and landed a nice brown. With that monkey off my back I decided to search for another opportunity to catch a fish on hook and video. I spotted a likely canidate just behind a white bankside rock. And this is where the second scene of the video picks up. I made several casts into this pocket and once again came to the conclusion that my set up had put the fish down. I was getting a little frustrated when I spotted a subtle feed just upstream of the white rock, and it was still in frame of the camera. So I moved up a couple feet, loaded the rod, and on the first cast was rewarded with the welcome sight of a big white mouth engulfing the fly.
It was fun to try something a little different, but I do have to learn just what is in frame as you will see later in the video. Other than that I am pleased with the results and hope to occasionally come across set ups that lend themselves to videoing and doing a little more of this.
Be sure to expand this to full screen if you can while watching it. So without further ado, here is the resulting footage.
4.20.2011
Fly of My Dreams
Yes, it's true. I admit that I have woken up in the middle of the night suddenly struck by a great idea for a fly, which will certainly fool that big trout that I threw everything in the fly box at the day before. Now it wasn't quite as an elaborate concoction of materials as the fly in this fun song but I can relate to the humor in this little ditty.
12.15.2010


8.13.2010
The Hopper Juan
It's been a while since I have done a step by step tutorial here for a fly pattern, and since it is hopper season, I thought I would share my favorite pattern to tie and to fish this time of year. The creator of this fly might disavow any connection to the abomination I tied up here, but I like the pattern a lot. You can check out the tutorial for the original Hopper Juan from the creator of the fly himself here. Here is my version with the main difference being some extra legs.
 |
| I use 2mm foam here for the bottom layer. I usually would use that for the top as well but for this tutorial I was tying a yellow body and all I had in yellow was some thicker foam. It's not as pretty but it still works. |
 |
| Tie on the bottom layer first then at the tie in point I dab on some Krazy Glue. Then stick on the top foam and tie it down. |
 |
| After 3-4 securing wraps I dab some more glue on the hook shank then advance the thread to where I want the next segment. I tie in both layers at the same time here. |
 |
| At this segment I tie in the legs. Here I am using Olive Medium Round rubber legs. I take a strip of two adjoining legs and tie a knot in it. Then tie it in leaving the long end towards the front as these will become my front legs. |
 |
| Then I again dab some more glue on the hook shank and advance the thread to make another segment. |
 |
| At this segment I tie in some Elk Hair. Here I used Bleached Yearling Elk. |
 |
| Then on top of that I tie in a few strands of Krystal Flash and trim them just a bit longer than the hair. |
 |
| Then I advance to tie the final head segment by tying in the bottom foam fist then trimming it as close as you can get with micro tip sissors. Then tie down the excess foam around the eye of the hook. This is the hardest step to keep from crowding the eye (which I did not do a very good job of on this fly). |
 |
| Next place another dab of glue on top of the bottom layer of foam and push the top foam down on it and tie it off at the eye. |
 |
| Then place another dab of glue on top of the head of the fly and advance the thread back one segment. Then fold the excess foam from the top layer back over the body of the fly |
 |
| take one of the rubber legs forward from each side and tie it down at this segment. |
 |
| Whip finish and then trip the excess foam going back over the body, and trim the rubber legs to the desired length and you are done. |
 |
| What the fish see |
 |
| What the birds see. |
 | ||
| It's trout candy during hopper season. |
 |
| This one got munched pretty good this morning... |
 |
| ...but it will still fish! |
6.08.2010
Orvis GIANT fly sale
As if Orvis needed any help, but I couldn't resist posting this commercial for their GIANT fly sale this month. It did make me chuckle.
4.26.2010
A New Tie
Nope, not one of those fathers day gifts you never wear...a fly I have been playing with and after a minimal amount of testing has been successful so far. Some tweaks will come but for now it looks like this: 
It's simple yet effective. I do think that a black bead at the head would make it a pretty good emerging caddis pupa imitation. That is the next step here but for now the recipe is here.
Hook: TMC 2457
Bead: Silver
Thread: Black 8/0
Tail: Partridge fibers
Body: Grey/Olive Turkey Biot
Thorax: Natural Possum
Wing: Partridge fibers
4.02.2010
Quigley Cripples and Floating Nymphs
I did a lot of tying tonight. Made my first try at some Quigley Cripples. Some bigger aimed at the Callibaetis, and some smaller that will be used for BWO's. Also worked on a couple nymphs that will ride closer to the surface, and hopefully work as an early emerger pattern.


3.25.2010
BWO Emerger
I got worked over today by some finicky fish chasing emergers in slow water. I came home and worked up a pattern that I will be giving a try next time something like this happens.

Hook: #18 TMC 206BL
Thread: Olive 8/0
Tail: Malard flank
Body: Gray/Olive Turkey Biot
Thorax: Olive Ice Dub
Wing and Wing Case: Single Natural Brown CDC feather

Hook: #18 TMC 206BL
Thread: Olive 8/0
Tail: Malard flank
Body: Gray/Olive Turkey Biot
Thorax: Olive Ice Dub
Wing and Wing Case: Single Natural Brown CDC feather
2.14.2010
Skwala Pattern

This pattern is to me the most appealing of all the Skwala patterns I have tied up this year. We will see what the fish have to say on that matter soon.
2.10.2010
Steelhead Anyone?

Last night after getting tired of tying #20 and #22 midge patterns I stuck a #2 hook in the vise and just winged it.
2.09.2010
Matuka

Courtesy of some chickens raised by my parents. Thanks to my mom for going to the work of preserving them to use for some flies. They make good Matukas. Now for some Photoshop fun:


1.28.2010
Skwala's
 Been messing around with a few variations that I hope will work this spring when the Skwala's start hatching. We will see how they work.
1.24.2010


12.19.2009
Pheasant

Goofing around with the ringneck pheasant cape I got in the mail today from a friend who recently returned from a successful hunt in South Dakota.
12.03.2009
CDC Shuck Biot Sparkle Dun
Another month is upon us and while late fall/early winter is a great time to start tying up some patterns to restock the fly boxes depleted by another year on the water, lets not abandon the fishing quite yet. I have had several great days on the river this past month. It does get a bit hit and miss as the weather and the water temps cool but when you hit it right the fishing can be outstanding. I have still been running into some great baetis hatches around here and so with that in mind I thought I would share my favorite pattern when fish are sipping the Blue Winged Olive Duns off the rivers surface. This pattern is basically a Sparkle Dun with a biot body, and I use a CDC feather for the trailing shuck instead of Z-lon. I like the Sparkle dun because it is so versatile. I think fish feeding on emergers, duns, and spinners could all find a reason to take a well placed Sparkle Dun. This version is quite simple to tie, it floats well, and is fairly easy to see even in the small sizes that will often be required. Lets get started with the materials:
Hook: #18 or smaller Tiemco 100 or equivalent dry fly hook
Thread: Olive 8/0
Wing: Olive Deer Hair
Tail/Shuck: One Natural Brown CDC feather
Body: Gray Olive Turkey Biot
Thorax: Medium Olive Fine Dry Fly Dubbing

1) In the winter months the bugs that do hatch tend to be small. For our rivers in Southeast Idaho I usually tie this pattern in sizes from #18-#24. You can definitely go larger or smaller if needed.
2) Tie in a clump of deer hair about 2/3 down the shank of the hook. I make about 3 good turns while holding the back of the hair so it stays on top of the hook while the tips flare out. Then clip the backs as close as you can at a 45 degree angle.
3) Next I pull up about 1/3 of the hair and make a wrap in front of it, then proceed to pull up another third, again making a wrap in front of that, then finally pull the remaining hairs straight up and wrap in front so that all the hair is standing up on the fly. Then be sure to build up a good thread dam in front of the wing as if you don’t, when the fly gets wet the wing will lean forward on you. Then wrap the thread back to behind the wing and tie down the loose ends on that side.

4) Now tie in the CDC feather on top of the hook shank. I don’t worry about how long the tail sticks out as I cut it later.

5) Continue securing the CDC feather wraping back to where the shank meets the bend.
6) Now I trim the tail to about 3/4 hook shank length.
7) Next tie in a Goose or Turkey Biot Quill with the notch facing left. Advance the thread to just behind the wing.
8) Wrap the biot using nice even wraps toward where you stopped the thread, then tie it off and clip the excess.

9) Next I simply dub a nice football shaped thorax using 2-3 wraps behind the wing and 3-4 in the front of it.
10) Finally make a nice even thread head and tie off the fly. Dab some head cement on there and you are ready to fish.
Play with the color scheme to match other mayfly hatches in your area as well. I like this pattern tied in appropriate colors for the summertime PMD hatches too. Most of all have fun and catch some fish!
10.29.2009
A Zebra Midge Variation
Late fall has arrived and a short flurry of snow here today reminded me that winter is on its way. Unless your favorite fishing location closes for the winter though you don’t need to hang up the fly rod just yet. I have a pattern that has become a favorite of mine from late fall through the early spring months. It is simple, and it works as a great midge pupa imitation.
I fish it a variety of ways. Often I will fish it with a double nymph rig as the bottom fly fishing it deep with the aid of split shot. In the spring I like to use it as a dropper off an adult Skwala Stonefly pattern on rivers that have that hatch and fish it in the top foot of the water column. It will work all year I am sure but my focus during the summer seems to shift to the many other hatches that take place and my use of this midge pattern takes a back seat.
Midges though are a popular winter staple for trout as they do hatch in many locations all year. Even on a cold winter day, the mid day sun can warm things up enough to bring about a midge hatch that will bring even the most lethargic of cold blooded trout to the surface.
This pattern is basically a Zebra Midge with a few slight modifications. It’s simple to tie, and has for the last couple years been my top fish catching pattern on a variety of rivers.

Figure 1-I usually tie this pattern on hooks size #18 or smaller. This one is on a #18 TMC 2457.

Figure 2-Push a 2mm nickel bead onto the hook.

Figure 3-Lay a base of black thread then I tie in a short tail of a few grizzly hackle fibers. Midges do not have a tail like a mayfly but I tie this with a few fibers at the end as I like to think it gives a little wiggle to the end of the fly.

Figure 4 – Tie in a short section of fine silver wire and advance the thread to the head of the fly building a slight taper with the thread as you go.

Figure 5 – Make evenly spaced wraps with the wire up to the head and tie off with the thread.

Figure 6 – Tie in a small loop of Iridescent Krystal Flash. Then whip finish and drop some head cement on the head and a little on the body of the fly.

Figure 7 – The finished product.
Subscribe to:
Posts (Atom)