
1.26.2012
8.13.2010
The Hopper Juan
It's been a while since I have done a step by step tutorial here for a fly pattern, and since it is hopper season, I thought I would share my favorite pattern to tie and to fish this time of year. The creator of this fly might disavow any connection to the abomination I tied up here, but I like the pattern a lot. You can check out the tutorial for the original Hopper Juan from the creator of the fly himself here. Here is my version with the main difference being some extra legs.
 |
| I use 2mm foam here for the bottom layer. I usually would use that for the top as well but for this tutorial I was tying a yellow body and all I had in yellow was some thicker foam. It's not as pretty but it still works. |
 |
| Tie on the bottom layer first then at the tie in point I dab on some Krazy Glue. Then stick on the top foam and tie it down. |
 |
| After 3-4 securing wraps I dab some more glue on the hook shank then advance the thread to where I want the next segment. I tie in both layers at the same time here. |
 |
| At this segment I tie in the legs. Here I am using Olive Medium Round rubber legs. I take a strip of two adjoining legs and tie a knot in it. Then tie it in leaving the long end towards the front as these will become my front legs. |
 |
| Then I again dab some more glue on the hook shank and advance the thread to make another segment. |
 |
| At this segment I tie in some Elk Hair. Here I used Bleached Yearling Elk. |
 |
| Then on top of that I tie in a few strands of Krystal Flash and trim them just a bit longer than the hair. |
 |
| Then I advance to tie the final head segment by tying in the bottom foam fist then trimming it as close as you can get with micro tip sissors. Then tie down the excess foam around the eye of the hook. This is the hardest step to keep from crowding the eye (which I did not do a very good job of on this fly). |
 |
| Next place another dab of glue on top of the bottom layer of foam and push the top foam down on it and tie it off at the eye. |
 |
| Then place another dab of glue on top of the head of the fly and advance the thread back one segment. Then fold the excess foam from the top layer back over the body of the fly |
 |
| take one of the rubber legs forward from each side and tie it down at this segment. |
 |
| Whip finish and then trip the excess foam going back over the body, and trim the rubber legs to the desired length and you are done. |
 |
| What the fish see |
 |
| What the birds see. |
 | ||
| It's trout candy during hopper season. |
 |
| This one got munched pretty good this morning... |
 |
| ...but it will still fish! |
4.26.2010
A New Tie

It's simple yet effective. I do think that a black bead at the head would make it a pretty good emerging caddis pupa imitation. That is the next step here but for now the recipe is here.
Hook: TMC 2457
Bead: Silver
Thread: Black 8/0
Tail: Partridge fibers
Body: Grey/Olive Turkey Biot
Thorax: Natural Possum
Wing: Partridge fibers
3.25.2010
BWO Emerger

Hook: #18 TMC 206BL
Thread: Olive 8/0
Tail: Malard flank
Body: Gray/Olive Turkey Biot
Thorax: Olive Ice Dub
Wing and Wing Case: Single Natural Brown CDC feather
12.03.2009
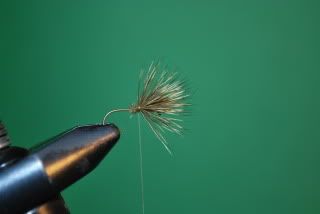
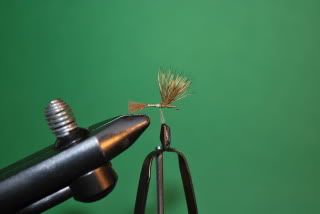
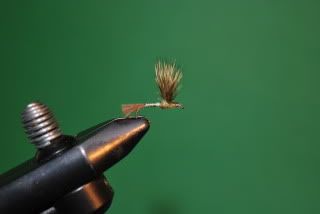
CDC Shuck Biot Sparkle Dun
Another month is upon us and while late fall/early winter is a great time to start tying up some patterns to restock the fly boxes depleted by another year on the water, lets not abandon the fishing quite yet. I have had several great days on the river this past month. It does get a bit hit and miss as the weather and the water temps cool but when you hit it right the fishing can be outstanding. I have still been running into some great baetis hatches around here and so with that in mind I thought I would share my favorite pattern when fish are sipping the Blue Winged Olive Duns off the rivers surface. This pattern is basically a Sparkle Dun with a biot body, and I use a CDC feather for the trailing shuck instead of Z-lon. I like the Sparkle dun because it is so versatile. I think fish feeding on emergers, duns, and spinners could all find a reason to take a well placed Sparkle Dun. This version is quite simple to tie, it floats well, and is fairly easy to see even in the small sizes that will often be required. Lets get started with the materials:
Hook: #18 or smaller Tiemco 100 or equivalent dry fly hook
Thread: Olive 8/0
Wing: Olive Deer Hair
Tail/Shuck: One Natural Brown CDC feather
Body: Gray Olive Turkey Biot
Thorax: Medium Olive Fine Dry Fly Dubbing

1) In the winter months the bugs that do hatch tend to be small. For our rivers in Southeast Idaho I usually tie this pattern in sizes from #18-#24. You can definitely go larger or smaller if needed.
2) Tie in a clump of deer hair about 2/3 down the shank of the hook. I make about 3 good turns while holding the back of the hair so it stays on top of the hook while the tips flare out. Then clip the backs as close as you can at a 45 degree angle.
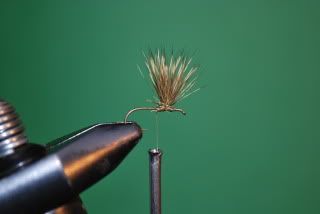
3) Next I pull up about 1/3 of the hair and make a wrap in front of it, then proceed to pull up another third, again making a wrap in front of that, then finally pull the remaining hairs straight up and wrap in front so that all the hair is standing up on the fly. Then be sure to build up a good thread dam in front of the wing as if you don’t, when the fly gets wet the wing will lean forward on you. Then wrap the thread back to behind the wing and tie down the loose ends on that side.

4) Now tie in the CDC feather on top of the hook shank. I don’t worry about how long the tail sticks out as I cut it later.

5) Continue securing the CDC feather wraping back to where the shank meets the bend.
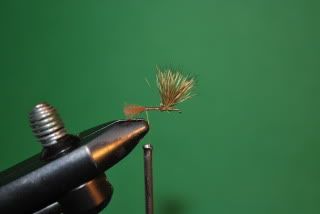
6) Now I trim the tail to about 3/4 hook shank length.
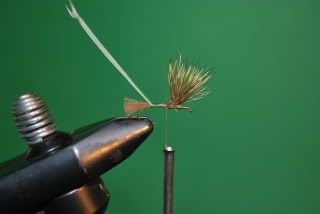
7) Next tie in a Goose or Turkey Biot Quill with the notch facing left. Advance the thread to just behind the wing.
8) Wrap the biot using nice even wraps toward where you stopped the thread, then tie it off and clip the excess.

9) Next I simply dub a nice football shaped thorax using 2-3 wraps behind the wing and 3-4 in the front of it.
10) Finally make a nice even thread head and tie off the fly. Dab some head cement on there and you are ready to fish.
Play with the color scheme to match other mayfly hatches in your area as well. I like this pattern tied in appropriate colors for the summertime PMD hatches too. Most of all have fun and catch some fish!
10.29.2009
A Zebra Midge Variation
I fish it a variety of ways. Often I will fish it with a double nymph rig as the bottom fly fishing it deep with the aid of split shot. In the spring I like to use it as a dropper off an adult Skwala Stonefly pattern on rivers that have that hatch and fish it in the top foot of the water column. It will work all year I am sure but my focus during the summer seems to shift to the many other hatches that take place and my use of this midge pattern takes a back seat.
Midges though are a popular winter staple for trout as they do hatch in many locations all year. Even on a cold winter day, the mid day sun can warm things up enough to bring about a midge hatch that will bring even the most lethargic of cold blooded trout to the surface.
This pattern is basically a Zebra Midge with a few slight modifications. It’s simple to tie, and has for the last couple years been my top fish catching pattern on a variety of rivers.

Figure 1-I usually tie this pattern on hooks size #18 or smaller. This one is on a #18 TMC 2457.

Figure 2-Push a 2mm nickel bead onto the hook.

Figure 3-Lay a base of black thread then I tie in a short tail of a few grizzly hackle fibers. Midges do not have a tail like a mayfly but I tie this with a few fibers at the end as I like to think it gives a little wiggle to the end of the fly.

Figure 4 – Tie in a short section of fine silver wire and advance the thread to the head of the fly building a slight taper with the thread as you go.

Figure 5 – Make evenly spaced wraps with the wire up to the head and tie off with the thread.

Figure 6 – Tie in a small loop of Iridescent Krystal Flash. Then whip finish and drop some head cement on the head and a little on the body of the fly.

Figure 7 – The finished product.
10.23.2009
Improved Sparkle Dun
